HOW TO INSTALL & USE LIGHTROOM PRESETS IN LIGHTROOM
To add and install presets into Lightroom there are a few methods to import Free lightroom presets and add them, depending on which version of Lightroom you use. We have included the methods for the different install versions below. If you are uncertain which version of Lightroom you are using, click on “Help” then “System Info”. The version you are using will be listed at the top of the box.
HOW TO IMPORT PRESETS INTO
LIGHTROOM CC 2021/2022 VERSION 5.1+ (.XMP)
1.Open your zip file.
2. Save the Greater than Gatsby preset folder in an easy to find location on your computer in preparation to import the Lightroom presets.
3. Open Lightroom, then open the edit panel and then open the presets panel as show in the image below.


5. Select the folder of the collection of presets you want to import. Note: You will import the whole folder, not the individual presets.
6. Your presets will install and be available to use in the presets panel.
HOW TO ADD PRESETS TO
LIGHTROOM CLASSIC CC 2021/2022 VERSION 11.1+ (.XMP)
- Open your zip file.
- Save the Greater Than Gatsby preset folder in an easy to find location on your computer.
- Copy (Command + C on a Mac or CTRL + C on a PC) the entire preset collection folder.
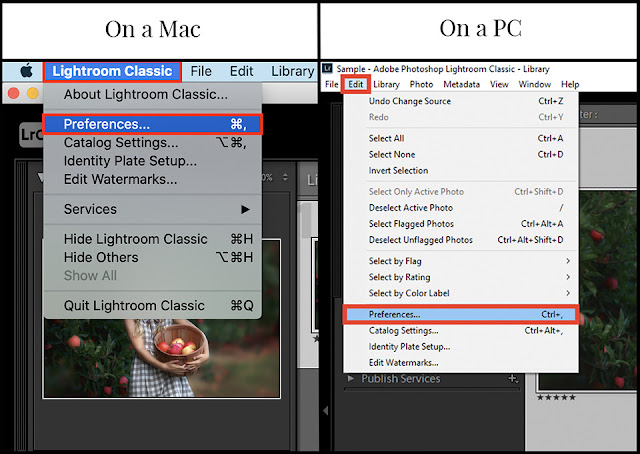
- Open Lightroom and select the following from the menu bar:
Mac – Lightroom Classic > PreferencesPC – Edit > Preferences
5. When the Preferences box pops up, make sure you are on the Presets tab, and then click the Show Lightroom Develop Presets button. *Note: It should take you to the location below for your computer. Turn on your show hidden files option to be sure you see locations below. Once in the “Camera Raw” folder, navigate to the “Settings” folder.

6. Paste (Command + V on a Mac or CTRL + V on a PC) the entire preset collection folder into the Settings folder.


very nice this colour
ReplyDeleteWow.. 😶😶
ReplyDelete01781893409
ReplyDeleteAdil
ReplyDeleteGood
ReplyDeleteGOOD
ReplyDelete